 We have used Blogger as a diary for all of our media coursework, it has details of the lead up to our trailer consisting of props, costumes, make-up and ideas. We have used this to help us keep track with the our trailer production and have been looking into poster designs alongside analysis of trailers. Blogger has been the center of our film information, allowing us to look in more detail at certain aspects. Blogger has been the easiest option to keep all our work on, it allows you to upload images, videos and screen grabs, you can add links to your work such as Prezi and powerpoints which gives you more techniques that you can use when blogging. It is a fast process which you can keep updating as you go along, if you want to add more information you can, it does not finalise your post.
We have used Youtube to upload our animatics, storyboard and our trailer along with a director's commentary. Youtube allows us to upload it to our blog, as you can't do it straight from Premier Elements. We used Youtube as it is a trusted and global website where you can easily upload footage and people can comment on the work you have done. It allows us to get some feedback from audience members and we can track how many views it has got. To upload the video from Youtube to our blog we embeded the link and added it to our blog.
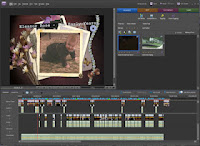
We have used Premier Elements again this year for our media production, we know how to use the site and have managed to get more interesting elements from it this time around. We discovered new effects that we could use such as 'ghosting', these different elements have made improvements to our trailer. The first step to creating our trailer was to set up a new project and upload our footage, to do this;
Adobe Premier Elements 10 - setting up a new project.
Step by step instructions:
Step 1 - Change settings
Step 2 - Double click Pal
Step 3 - Double click HDV
Step 4 - Double click HDV720P25
Step 5 - Clcik OK
Save as Adobeflashvideo
presets-5th one down ~ FLVweblargepalsource (8 and higher)
-SAVE
The next step is uploading the footage to do this you click get media, click files and folders and select all the videos you want to use, it then uploads it to the site. When all the videos appear on screen, the will play if you double click them.
To begin creating the trailer we looked at all our footage and decided to play around with the order, so we dragged the videos into the boxes on the sceneline at the bottom. Once we had decided that the order was ok, we placed in the music and this helped us to fit the scenes around the pace of the music. We found some of the footage worked best with certain parts of the music and other sections didn't fit. To add music you do the same action as you would to get the footage except you click on your music that you have inyour files and folders. It then comes up in the same section as your footage, you can then drag it below your footage and it should play along with the videos.
We used the timeline part rather than sceneline after we added the music, this is because we found it easier to organise the footage and we could see how long our trailer was as it was progressing. Once we had all the music and videos together, we worked on the pace of our shots, we cut some of the clips down by moving the cursor over the clip you want to cut down and it will automatically allow you to crop the clip with a click of the mouse. You simply drag it to the exact time you want it to be.
We looked into special effects, we clicked edit on the screen and it shows you all the video effects that are available. We played around with a few to see what they looked like and whether we thought they would be effective. When on the editing part you we added our tintertitles, using the title section, this allowed you to write over a blank screen. Due to us filming in the snow some of our footage was bright from the white snow, so we looked at all the footage and decided to make it darker, to make the clips darker you choose the clip you want and there is a yellow line across it that you can drag higher or lower to change the contrast. The last thing we did after doing all the music,videos and editing was to add the twisted pictures at the begnining, we did this by downloading the clip from youtube onto a memory stick and then uploaded it to Premier Elements. During the process it did not crash and our trailer came out well, we had no problems with the footage or editing.
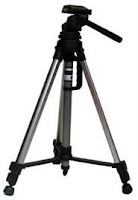
We used the school tripod to keep our filming steady and accurate, although some of the shots we wanted to look like it was someone holding the camera so it was alright for them to not look professional. The tripod was easy to handle although when filming in the snow it was harder to get it sturdy, causing us some problems as it took more time to set up, however it was simple to use as it held the camera in place and gave us the shots we wanted. The tripod allowed us to create a variety of shots, as we could make it lower to the ground or make it higher, we used it to pan so that it was flowing and not shaking. If we hadn't used a tripod our shots would have been less professional and it would have shown in our trailer, the effect of the trailer would be different as some of the shots wouldn't of looked right. The tripod gives you the chance to create perfect shots that you want and you are not worried about it moving.

We used Kellie's camera to film as we knew it had a clear image and we could use it accurately, it was light and easy to handle. It fitted onto the tripod and we were able to film many shots, we didn't have to worry about any shots not coming out right. With the camera we were able to zoom in or zoom out creating different angles and shots to establish certain aspects of the trailer. The camera was fine when filming and when uploading the shots onto the computer it was fast and there were no problems with the footage being too high in resolution. We used it for the basic filming of the shots, everything else was down to how we edited it on the computer for special effects.
No comments:
Post a Comment